MS SQL Server 백업
Before taking database backup for your MS SQL Server database server, a lightweight agent needs to be installed on the database server, please refer to Agents for how to install agents on your database servers.
에이전트 설치가 완료되면 아래 단계에 따라 데이터베이스 백업 작업을 생성하세요.
애플리케이션 구성
After the installation of Vinchin physical backup agent on SQL Server database nodes, please open Vinchin Backup Server web console and go to Resources> Infrastructure > Agents & Client page, find the target agent, click on Options and then select Application to configure application settings for database backup.

Configure Application 버튼을 클릭하여 애플리케이션 설정을 구성합니다.
In the Application Type dropdown list, please select SQL Server. Select the SQL Server instance and click on Next.
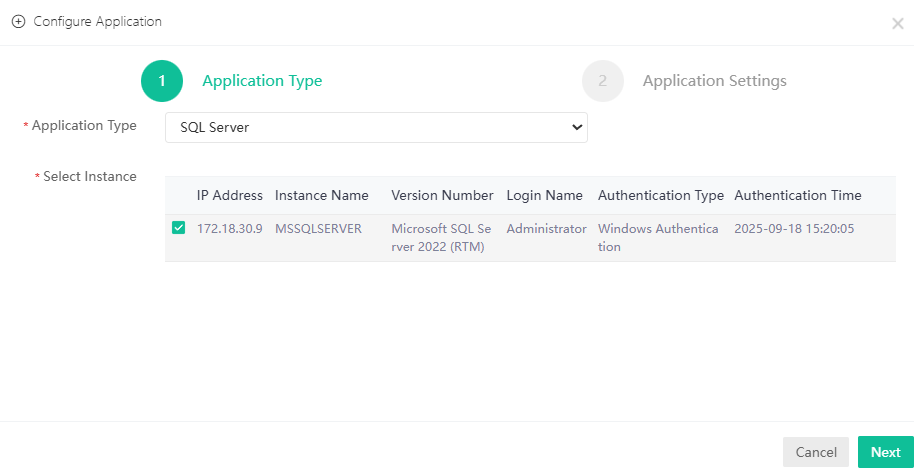
There are two authentication modes, Windows Authentication and SQL Server Authentication. If customers want to backup MS SQL failover cluster, please select the SQL Server Authentication to configure the application settings.
If select Windows Authentication, please enter the username and password to log in to the operating system of database server.
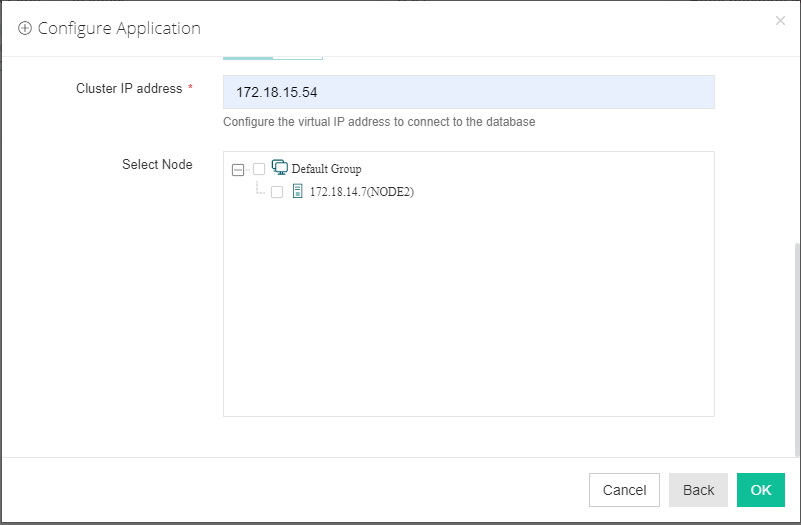
If select SQL Server Authentication, please fill in the username and password used to log in to the database you want to back up. For MS SQL failover cluster, please enable the Failover Cluster option. Fill the Cluster IP address of MS SQL cluster. Select other database nodes to connect the database cluster.
Before backing up MS SQL Server database
Check the Backup Services Log On Account
Check the Backup Services Log On Account
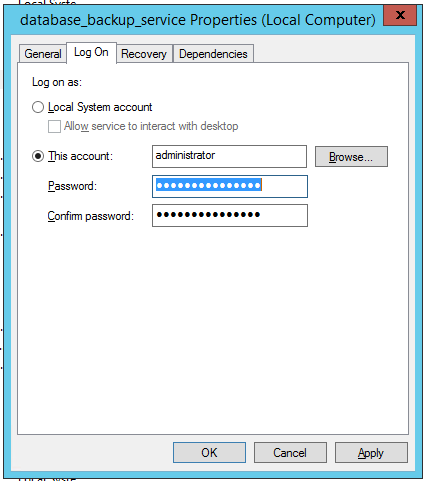
If you want to use Windows Authentication mode to configure the database for backing up, please edit the database backup services to log on as administrator from Windows Services. Please first stop the "database_backup_service" and "database_transfer_service" services by right click on them and select Stop.
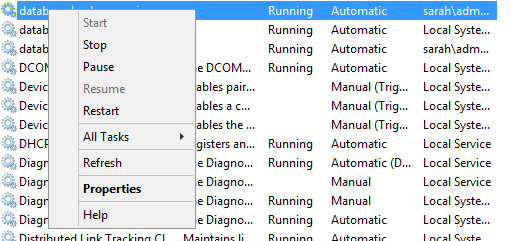
When these 2 services have been stopped, right-click on them and select Properties > Log On, select log on as this account, then fill in the administrator account name and password, click on Apply and restart the backup services.
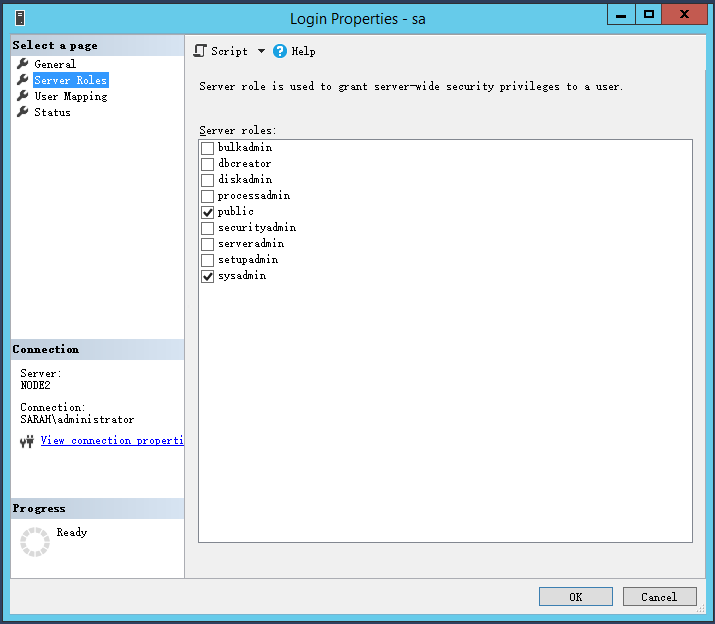
Check Database User Permission
If select SQL Server Authentication mode to configure application. Please check the database user permissions for which you wish to perform SQL Server database backup, at least ensure the user has sysadmin permission, check the details below.
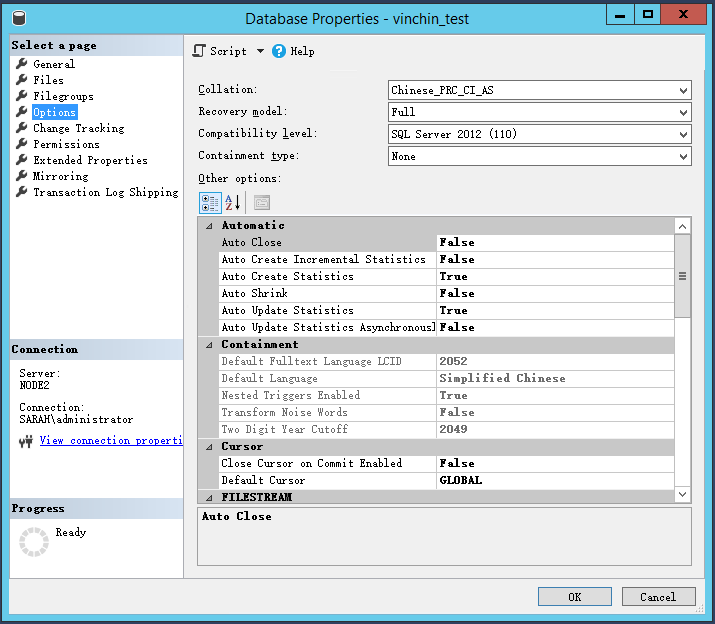
데이터베이스의 복구 모델을 확인하세요. 복구 모드가 "Full"인지 반드시 확인하세요. 그렇지 않으면 로그 백업 작업이 실패합니다.
Check the recovery model of database, please ensure the recovery mode is “Full”, otherwise log backup job will fail.
백업 작업 생성
To create SQL Server database backup jobs, please go to Backup > Database page. There are 4 steps to create a database backup job.
Step 1: Backup Source
First select database backup agent from left column, then expend SQL Server instance and select the databases which need to be backed up.
Step 2: Backup Destination
이 백업 작업에는 백업 대상(백업 스토리지)을 연결해야 합니다.
In the Target Storage column, the storages belong to the selected backup node can be selected.
In the Target Node column, you can select a backup node on which you want the backup data to be processed and stored. When done selecting the backup node, please click on Next button to continue.
Step 3: Backup Strategies
General Strategy에는 Schedule, Throttling Policy, Data Storage Policy, Retention Policy가 포함됩니다.
Schedule 필드에서 백업 작업의 시간 일정을 구성할 수 있으며, 작업을 Backup as Scheduled 작업, Once-off Backup 작업 또는 On Demand 작업으로 설정할 수 있습니다.
한 번만 실행되는(once-off) 백업 작업의 경우 작업은 한 번만 실행되며 전체 백업만 수행됩니다. Time Schedule 필드에서 백업 작업을 시작할 시간만 지정하면 됩니다.
예약된 백업 작업의 경우 Full Backup, Differential Backup, Log Backup을 일정으로 설정할 수 있습니다. 여기서는 이 세 가지 백업을 예시로 설명합니다. 실제 요구 사항에 맞게 백업 모드와 백업 일정을 설정한 후 Next를 클릭하여 계속 진행하세요.
온디맨드 작업의 경우 Full Backup, Differential Backup, Log Backup을 필요에 따라 수동으로 실행할 수 있습니다.
Throttling Policy는 선택 사항입니다. 필요한 경우 데이터베이스 백업 중 전송 속도를 제한하는 데 사용할 수 있습니다.
Data Storage Policy 섹션에는 Data Deduplication, Data Compression, Data Encryption의 세 가지 옵션이 있습니다. 이 세 가지 옵션을 활성화하면 백업 데이터가 백업 스토리지에 기록되기 전에 중복 제거, 압축 및 암호화됩니다.
데이터베이스 백업의 보존 정책에는 Number of Restore Points 또는 Number of Days에 따라 데이터베이스 백업을 보존하는 2가지 보존 모드가 있습니다.
보존 모드 Number of Restore Points의 경우, 복원 지점은 해당 전체 백업에 종속된 차등 백업 및 로그 백업을 포함하여 전체 복원 지점 단위로 계산됩니다.
보존 모드 Number of Days를 선택하면 Vinchin Backup Server는 지정된 일수 내의 복원 지점을 저장합니다.
보존 정책이 적용되면, 보존 정책을 준수하기 위해 오래된 복원 지점이 삭제됩니다.
전송 전략에서 데이터 안전을 위해 Encrypted Transmission을 활성화하도록 선택할 수 있습니다. 백업 데이터는 기본적으로 LAN을 통해 전송됩니다.
Script configuration은 기본적으로 비활성화되어 있습니다. 활성화하면 백업 전후에 실행할 스크립트를 구성할 수 있습니다. 백업 전 스크립트: 데이터베이스 백업 전에 실행되며, 예를 들어 데이터베이스 작업을 비활성화하는 데 사용합니다. 백업 후 스크립트: 데이터베이스 백업 완료 후에 실행되며, 예를 들어 데이터베이스 작업을 다시 활성화하는 데 사용합니다.
Security Strategy에는 WORM Protection과 Integrity Check가 포함됩니다. WORM Protection(Write Once Read Many)을 활성화하면 만료 전에는 백업 지점을 수정하거나 삭제할 수 없으며, 보존 기간은 연장만 가능합니다. 기본 보호 기간은 7일이며, 1일에서 9999일 사이로 구성할 수 있습니다.
증분 백업 수행 전 Integrity Check(검사 주기를 초과한 경우)는 백업 데이터의 소스 데이터 정보 일부를 확인하여 백업 지점의 상태를 검증합니다. 검사 일정을 선택하고 백업 지점이 비정상일 때 재실행(Redo) 또는 종료(Terminate) 작업을 지정할 수 있습니다.
Advanced Strategy에는 Check Database Integrity, SQL Server Compression, Page Checksum, Retry strategy, Overload Protection이 포함됩니다.
Check Database Integrity 기능은 데이터베이스 백업 작업이 시작되기 전에 데이터베이스의 무결성과 물리적 오류를 검사합니다.
SQL Server Compression은 SQL Server에서 제공하는 기능으로, 데이터 전송량과 백업 시간을 줄이고 백업 스토리지를 절약합니다.
Page Checksum은 전송 중 백업 데이터를 검증하여 데이터 손상을 방지하는 데 사용됩니다.
네트워크가 불안정할 때 Retry Attempts 횟수와 Retry interval을 설정하면 현재 네트워크에 재연결할 수 있어 네트워크 불안정으로 인한 작업 실패 요인을 줄일 수 있습니다.
Operation Exceptions에 대한 자동 재시도 기능으로, 활성화하면 작업 실행 중 작업 예외가 발생할 경우 구성된 재시도 전략에 따라 재실행합니다. 이 메커니즘은 RPC 원격 호출 예외로 인한 작업 실패를 줄여줍니다.
Job Retry를 활성화하면 작업 실행 중 개체 예외가 발생할 경우 구성된 재시도 전략에 따라 재실행합니다. 다른 백업 개체를 재시도할 때 일부 개체의 백업 실패로 인한 중복 백업을 줄여 작업 효율성을 향상시킵니다.
Overload Protection을 활성화하면 백업 노드에 리소스 제한이 구성된 경우 해당 노드에서 실행되는 백업 작업이 해당 제약 내에서 동작합니다. 기본적으로 백업 작업에는 리소스 제한이 적용됩니다. 우선순위가 높은 작업의 경우, 이 설정을 활성화하면 노드 리소스 제한을 우회할 수 있습니다.
주의
General Strategy의 Compressed Transfer와 Advanced Strategy의 SQL Server Compression 중에서는 일반적으로 General Strategy의 Compressed Transfer만 활성화하는 것을 권장합니다. SQL Server Compression은 CPU와 메모리를 더 많이 사용합니다.
4단계: 검토 및 확인
위의 설정을 완료한 후 한 화면에서 설정 내용을 검토하고 확인할 수 있습니다.
데이터베이스 백업 작업을 식별하기 위해 작업 이름을 지정할 수 있으며, Submit 버튼을 클릭하여 백업 작업을 생성합니다.